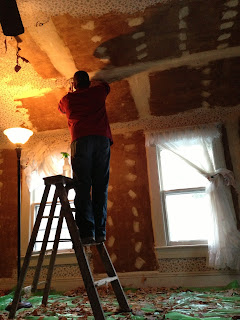
There are lots of wallpaper removal tutorials online. Most of these involve a steamer and easily peeling sheets of paper from the walls. That's great... if the person who applied the paper bothered to prep the walls first.
That didn't happen in our case! Plus, we were dealing with wallpaper on a ceiling. It wouldn't be too safe to steam right above your head.
After a lot of experimentation, we found the following tools to be essential for wallpaper removal:
- Spray bottle of diluted fabric softener
- Spray bottle of diluted vinegar
- Wallpaper scorer
- Paint scrapers of assorted sizes
- Drop cloths
- Ladders
- Persistence
- Patience
Master Bedroom (with Wallpapered Ceiling)
The first room we tackled was the master bedroom. I remember spritzing the wall with a mixture of fabric softener and water and tentatively scraping those first few times. Would we damage the walls? Would this work? Should we just leave it alone and paint over it?
Things moved super slowly, but as time went on we started uncovering more and more drywall. Yes, there were some dings along the way, but nothing a little plaster couldn't fix later on.
Things moved super slowly, but as time went on we started uncovering more and more drywall. Yes, there were some dings along the way, but nothing a little plaster couldn't fix later on.
Sometimes the wallpaper came off in neat strips about a foot long and a few inches wide. Other times the most that could be removed at a time was a few inches long and a couple inches wide.
The worst part was the ceiling. By then, I'd moved on to scraping in other rooms so Joe (my husband) could work on the ceiling. It was tough work to bend and reach at the same time. Although I think sanding all of the patched spots later on was even worse for him!
Because this room was so much work, we had to take frequent breaks to work on other rooms instead, just to get away from it. Despite being the first one we started, this room was the last one we finished.
Former Dining Room (with Chair Rail)
The next room we started seemed like it had once been a dining room - there was a chair rail all the way around. This one seemed like it would be sooo easy because some of the wallpaper was already starting to hang off in sheets. We were soooo wrong in this theory. Sure, the seams had loosened as the glue dried out, but the middle was absolutely stuck on. And there was a lot of damaged sheetrock around the windows thanks to a previously leaky roof.
This room took tons of scoring. Because of the type of wallpaper or glue, the fabric softener was not as effective. This is where we switched to spraying on a mixture of vinegar and water. This room also took a lot of scoring prior to scraping.
Luckily, it this paper did come off in fairly large pieces, but there was still a lot of scraping to be done.
Small Bedroom (the Fun One)
I almost considered leaving the wallpaper on the walls here. It was the least offensive in terms of pattern, and wasn't too stained or torn. In the end I decided it would be better to just deal with it all while the house was empty of furniture.
This room was fun because of what we discovered under the walls. A former occupant had used a crayon to draw several things...
At first, one drawing looked like a dinosaur walking into a cave (but as I continued scraping, it turned out to be Kilroy).
The Corner Bedroom (with 3 Layers)
The corner bedroom was yet another one I considered leaving alone. Initially we just planned on doing the master bedroom so we wouldn't have to fall asleep staring at stained wallpaper each night. That would drive us crazy! But as we moved along, we realized we wouldn't want to do this process with furniture around. It was easier to maneuver the drop cloth and ladder around an empty room.
We knew this room had two layers of paper. This was clear in a spot where the top layer was torn. The room also had a stuck-on wallpaper border around the top.
Partway into scraping the first wall, I discovered that there were not two but THREE LAYERS of wallpaper. The oldest was a gray background with yellow roses. Now it wasn't super old, because this room was sheetrocked rather than having walls made of lath and plaster, but it was still pretty old. And it did not want to come off.
This room was by far the most frustrating, maybe even more so than the wallpaper on the ceiling. By this point we were over wallpaper. But this wallpaper was not over being stuck on the walls. It took forever, lots of scoring, spraying, scraping, and repeating. Little by little we got it done.
And we all vowed to never apply wallpaper again, because nobody should have to go through this tortuous process!
I also felt really agitated by the scent of vinegar for a while. I mean, I smelled like it for more than two months straight. It took some time to get over that!
I publish 5 new blog posts each week! Check out the schedule. You can also click on the link below for blog updates.


No comments:
Post a Comment